My Favorite Dairy Free/Gluten Free Recipes
Pretty much all of these recipes are from another website. I give credit at the bottom of each recipe. There are on MY page because I've been making these recipes over and over and we never tire of them...they are GOOD. Enjoy!
(PS: If you are new to GF, take a look at some of the websites I've cited, there are lots of recipes to discover.)
Click on the recipe to go right there, or just scroll and read.
Sweet Potato Tagine with Pine Nut CousCous
Almond Butter Brownies
Source: www.FoodBabe.com
if you have a Costco membership, their Almond Butter is perfect for this recipe and reasonably priced.
Serves: 12
1 cup almond butter
1 egg
1/2 tsp sea salt
1/2 tsp baking soda
1/2 cup sugar
1/2 tsp vanilla
1/2 cup chocolate chunks
Instructions:
Preheat oven to 350 degrees
Grease a small dish (8×8 or 8×6) thoroughly or line bottom of dish with
parchment paper (parchment is best)
Mix all ingredients except chocolate chunks until smooth
Fold in chocolate chunks and pour batter into pan
Bake brownies until golden dark brown – about 25 mins
Cool brownies for at least 10 mins before cutting
Quick notes
Please use all organic ingredients if possible
It’s very important to use big chucks of chocolate
They freeze nicely
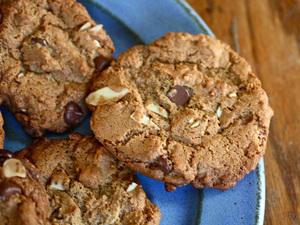
Almond Butter Cookies
Source: www.npr.org
Probably the best GF cookie you'll ever eat. There is nothing to compare. An added plus: no grains!
if you have a Costco membership, their Almond Butter is perfect for this recipe and reasonably priced.
note: I've found that if I make the dough and let it sit in the frig for an hour or two before baking, the flavor gets more caramel-ly and these cookies are even BETTER, if that is possible.
Serves: 30
1 cup almond butter
1/2 cup light or dark brown sugar
1/2 cup granulated sugar
1 large egg
1 teaspoon baking soda
2 tablespoons maple syrup
1 teaspoon vanilla
Pinch of salt
1/2 cup slivered almonds (or nut of your choice)
1/2 cup semisweet chocolate chips - make sure there is no milk in the ingredient list
1/2 cup rolled (old-fashined) oatmeal - optional
Instructions:
Preheat oven to 350 degrees.
Grease a baking sheet with butter and set aside.
In a large bowl, stir almond butter and sugars together until well combined.
Add egg, baking soda, maple syrup, vanilla and salt and mix well. Stir in the
almonds and chocolate chips.
Using a teaspoon, scoop out small, walnut-sized amounts of dough and roll them
in your hands to form a ball. Place on cookie sheet about 1 inch apart. Bake 10
to 12 minutes, until lightly browned. Cool for 5 minutes.
Gluten Free Pie Crust
Source: www.ArtofGlutenFreeBaking.com
more often, I'll make a 'crumble', but every once in a while, I want a real pie crust.
Serves: 8
2 1/3 C (350g) Jeanne’s Gluten-Free All-Purpose Flour Mix
1 TBL granulated sugar
1/4 tsp salt
1 C (8oz; 230g; 2 sticks) unsalted butter, cold and cut into pieces (you can also use lard or Earth Balance)
1 TBL vinegar (I use apple cider vinegar)
5-7 TBL cold water
extra tapioca flour for rolling out
Jeanne’s Gluten-Free All-Purpose Flour Mix
1 1/4 C (170g) brown rice flour
1 1/4 C (205g) white rice flour
1 C (120g) tapioca flour
1 C (165g) sweet rice flour (also known as “glutinous rice flour” or under the brand name, Mochiko)
2 scant tsp. xanthan gum
To make the crust:
Place flour, sugar, and salt into a large bowl. Mix together with a spoon until
combined. Add butter pieces to the dry ingredients mixture. With fingers, start
rubbing together the butter and the dry ingredients. This will take some time.
Do this until the resulting mixture looks like wet sand mixed with pebbles. I
like to do this by hand to get a feel for the dough. You may also do this
initial mixing with a food processor if you’d like:
Add the vinegar and rub into the mixture. Add water a TBL at a time, rubbing
into the mixture. You want to add enough to create a dough that holds together
well, but isn’t wet. During the winter here in Seattle, I’ve consistently used
about 6 TBL. During the summer I’ve used closer to 5 TBL.
Divide the dough into two fairly equal pieces, shape into disks, and wrap each
disk separately in plastic wrap. Refrigerate the disks for 20-30 minutes (or
until the disks are cool and nicely firm but not hard). NOTE: if your kitchen
isn’t too hot, you can roll out your first crust right away. Just put the other
piece in the fridge to chill while you roll out the first piece. My kitchen
rarely gets too hot, so I always roll the first piece right away. This is
always the easiest dough to roll–it’s at the exactly right temperature.
Prepare your rolling surface. Sprinkle tapioca flour over your rolling surface.
Also sprinkle flour over your rolling pin. When the disks are chilled, remove
the first disk of dough from the fridge and place on your prepared rolling
surface and sprinkle top of dough with tapioca flour. The key to successfully
rolling out gluten-free pie dough is to go slow. When I say slow, I mean SLOW.
And with a light touch. If your dough starts cracking, slow down and don’t
press so hard with your rolling pin. With your rolling pin, carefully and
patiently roll out the dough into a 12″ circle (it should be at least 3″ larger
than the top of your pie pan). If the dough sticks to the rolling pin, add more
tapioca flour.
NOTE: the dough should be cool but not too cold. It should roll fairly easily
and should not break while you’re rolling it. If it does break a bit, don’t
worry–breaks are easily fixed by smoothing the dough over the breaks. If it
seems too cold and you’re really having to work hard to roll it and it’s
breaking a lot, step back and let it warm up a little bit before you continue.
Alternately, if the dough is floppy and seems to be “sweating,” it is too warm
and should be refrigerated for awhile longer
In the next step, you are going to roll the dough around the rolling pin in
order to transport it to the pie pan. In order to do this, sprinkle tapioca
flour over the entire surface of the pie crust dough. Now, put the rolling pin
on top of one side of the dough. Wrap the dough around the roller until you’ve
gotten all of the dough onto the pin. The dough should roll easily around the
pin without any breaking.
NOTE: again, if the dough breaks a lot while you’re rolling it around the pin,
it’s a bit too cold. Step away and let the dough warm up a bit before
proceeding
Lift the pin with the dough rolled around it and put on the top of your pie pan
Unwrap the dough from your rolling pin onto the pie pan so the pan is covered
evenly. Now carefully press your dough into place. Proceed slowly, starting
with the middle bottom of the pie pan and working out to bottom corners and
then up the sides
When you get to the rim, press the dough onto the rim. Finally, press down and
carefully tear off any leftover dough (set these scraps aside–you will use them
later)
You now have the bottom crust dough in place
Place your pie pan with the bottom crust dough in place into the refrigerator
while you roll out the top dough.
Preheat your oven to the temperature required for your chosen pie filling.
Roll out the top dough the same way you rolled out the bottom dough.
Remove pie pan w/dough from refrigerator. Place filling inside it and dot with
cold butter pieces
Roll top crust dough onto your rolling pin just as you did with the bottom
crust dough. Transfer and unroll over the top of your pie filling
Carefully press top and bottom crust dough together at the rim to form a seal.
You can create a decorative edge by pinching the dough together with your thumb
and forefinger of one hand and the forefinger of the other hand. Or, you can
carefully press down along the rim with the tines of a fork. Be sure you’ve
created a good seal–any unsealed portion will leak filling all over your oven
floor during the baking process
Now make slashes in the top crust dough to create air vents for steam to escape
during the baking process. I usually do two levels of them–the top row
alternating with the middle row–to make it decorative.
If you are so inclined, roll out some of the leftover scrap dough and cut out
cute designs to put on the top of pie. For example, for an apple pie, I cut out
an apple with a leaf:
Also, if you want a little bit of a glaze on top of your pie, I recommend using
some beaten egg to brush on the top and then sprinkle with granulated sugar. It
will create the effect of the top photo of this post.
Now your pie is ready for the oven! Your baking time and temperature will
depend on your filling. I usually bake apple pies for 10 minutes at 450 degrees
and then lower the temperature to 350 and bake for another 35-45 minutes.
Baked Peanut Chicken
Source: www.atasteofthai.com
A very easy 3-ingredient dinner that is fancy enough for company.
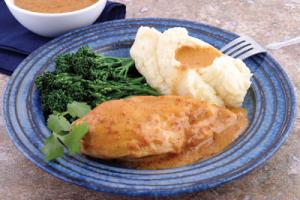
Serves: 6-8
Ingredients:
2-3 lbs boneless, skinless chicken
1-13.5 oz can Coconut Milk
1-3.5 oz box Peanut Sauce Mix (A Taste of Thai)
Instructions:
Preheat oven to 350°F. Add Peanut Sauce Mix (use both inner envelopes) and
Coconut Milk to a baking dish. Whisk together. Add chicken, dredging both sides
of chicken in peanut sauce.
Bake uncovered for 25-30 minutes or until done. Spoon extra sauce over rice,
potatoes or pasta.
Homemade TRIO Bars
source: www.enlightenedcooking.blogspot.com
We keep these in the pantry at ALL times. I've made alot of changes to the original recipe, mostly to make them easier to make and keep. I make a 2 batches at a time, but each batch goes into a 8x8 pan. So that's two 8x8 pans.
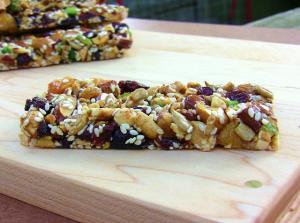
Serves: 8
Ingredients:
1 cup coarsely chopped toasted or raw nuts (e.g., cashews, almonds, pistachios, walnuts)
1/2 cup seeds (e.g., green pumpkin seeds (pepitas, sunflower seeds, sesame seeds)
1/3 cup chopped dried fruit (any variety/combination to create different tastes; this also includes unsweetened coconut)
1/8 tsp fine sea salt
1/4 cup light cane syrup (I use Karo, it is NOT HFCS). Honey or Brown Rice Syrup doesn't work; the bars are sticky, not crispy.
Instructions:
1. Preheat oven to 325F. Line an 8" square pan with foil and spray with non-stick spray.
2. In a medium bowl, combine the chopped nuts, seeds, and dried fruit.
3. Add the salt and syrup and stir to coat.
4. Scrape/dump mixture into prepared pan. Now, to press it out evenly: Lightly
spray the back of a rubber spatula with Pam. Press, press, press till everything is
flat and even.
5. Bake for 18 minutes (the bars will not be hard at this point). Place pan on
cooling rack and let cool for 5 minutes (give or take) until partially
set up (it will depend on how hot or cold the kitchen—just don’t cool
completely). Lift out the foil liner and then cut into 8 bars.
6. Go and do something else until bars are completely cooled. Once cooled, the
bars will come right out. Wrap in plastic wrap and store in an airtight
container at room temperature for up to 2 weeks.
KIND Bars Variation: KIND bars follow the same basic ratio as the TRIO bars
except (1) they do not have seeds, (2) the fruit and nut bars include a small
amount of crisp rice cereal; (3) there is also an all-nut (no fruit) option;
and (4) KIND bars use honey (Trio bars use brown rice syrup), but you can use
either, or barley malt syrup. Here’s what to do:
Fruit and Nuts KIND Bars: Follow recipe for TRIO Bars above, but omit the
seeds; increase the nuts to 1-1/3 cups and add 1/4 cup crisp rice cereal (if
cooking gluten free, be sure to use a gluten-free crisp rice cereal such as
Erewhon; otherwise, Rice Crispies are fine).
Just Nuts KIND Bars: Follow recipe above for TRIO Bars, but omit the seeds and
dried fruit; increase the nuts to 2 cups and add 1/4 cup crisp rice cereal (if
cooking gluten free, be sure to use a gluten-free crisp rice cereal such as
Erewhon; otherwise, Rice Crispies are fine).
Note about Toasted vs. Raw Nuts: I am a big fan of the toasted nut. You can use
either raw or toasted in these bars, but seriously…they are so much yummier if
you toast the nuts first! If you, like me, experience burst of laziness, feel
free to use roasted nuts (seeds, too). If they are lightly salted, just be sure
to omit the added salt.
Note about Measuring Nuts: Measure the nuts BEFORE you chop (i.e., 1 cup
unchopped nuts, then chop them). If you measure 1 cup chopped nuts, you will
have too many.
Note about Measuring Dried Fruit: Conversely to measuring nuts, here you want
to chop the fruit first, and then measure.
Note about Pans: If you don’t have the correct pan size, don’t fret. If you
have a 9-inch pan, you can increase all of the quantities slightly (e.g., about
1-2/3 to 1-3/4 cups total nuts and seeds, 1/2 cup dried fruit, 1/3 cup syrup).
Cooking times remain the same. And if you only have a round pan, use it! Who
says these have to be cut into rectangles? Wedges or crazy shapes are pretty
cool and every bit as delicious.
Flourless Chocolate Cake
Source: glutenfreegoddess.blogspot.com
This is a very special, very rich cake that is perfect for a special occasion. Cut the pieces small!
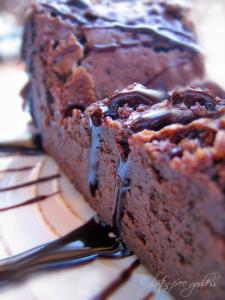
Serves: 16
Ingredients:
16 oz. Belgian dark chocolate (or use your favorite dark chocolate bars)
1 cup organic light brown sugar, packed
1/2 cup organic white cane sugar 3/4 cup very hot strong coffee (or use espresso powder in very hot water)
2 sticks unsalted butter, room temperature, cut into pieces
2 tablespoons unsweetened organic cocoa powder
8 large organic free-range eggs, at room temperature
1 tablespoon bourbon vanilla extract- yes, a tablespoon!
Instructions:
Preheat the oven to 350ºF. Prepare a 10-cup Springform pan by lining the bottom
with buttered parchment
Note: Using a smaller cake pan will result in a longer baking time; adjust
accordingly and keep an eye on the edges; if it browns too much while the
center is still wet, wrap edges in foil; or if you are using a smaller pan, try
placing it inside a warm water bath as Dorie Greenspan suggests.
Break up the dark chocolate into pieces and pour the chocolate into the bowl of
the food processor. Pulse until the chocolate breaks up into small bits. Add
the sugar. Pulse until the chocolate and sugar turns into an even, sandy grain.
Pour the hot water or coffee slowly into the feed tube as you pulse again.
Pulse until the chocolate is melted. Magic!
Add the butter pieces and the cocoa powder, and pulse to combine. Add the eggs
and vanilla, and process till smooth. The batter will be liquid and creamy.
Pour the batter into the lined Springform pan. Wrap the outside of the whole
pan with a big piece of foil. Bake at 350º F in the center of the oven, till
puffed and cracked and lovely - about 55 to 65 minutes. (Note - it took an hour
plus 15 minutes when I baked this at high altitude.) Use a wooden toothpick to
check the center of the cake; pick should emerge clean, with maybe a crumb.
Place the cake pan on a wire rack to cool. The cake will deflate. Don't worry!
When cooled a bit, press down on it gently with a spatula to make it even, if
you wish. Or not.
When the cake is completely cooled, cover, and chill it for at least three
hours (best up to eight hours), until serving. Overnight is even better.
Serve thin slices with drizzled chocolate sauce or a sprinkle of sifted
powdered sugar. Garnish with a fresh berries or mint leaves.
Read more: http://glutenfreegoddess.blogspot.com/2007/01/flourless-chocolate-cake_11.html#ixzz1rmbhxczs
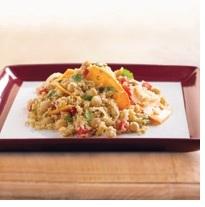
Edamame Salad
This is a great recipe that works well for potlucks or other times when you're not sure if there will be anything else that YOU can eat. It hits all the spots: fruit, veggies, protein, sweet, etc. And it holds for a few days if you don't eat it all the first day.
Ingredients:
8oz Garbanzo Beans, drained
4oz Whole Edamame, shelled
4oz Frozen Corn & Green pepper medley
3oz Craisins
1.5 tsp Italian Seasoning
1.5 tsp ground Cumin
2.5oz GREEK DRESSING
GREEK DRESSING RECIPE
3 tablespoons and 1/2 teaspoon olive oil
1/2 teaspoon garlic powder
1/2 teaspoon dried oregano
1/2 teaspoon dried basil
1/2 teaspoon pepper
1/2 teaspoon salt
1/2 teaspoon onion powder
1/2 teaspoon Dijon-style mustard
1/4 cup and 1 teaspoon red wine vinegar
Instructions:
Add first 4 ingredients
mix last 3 ingredients in a measuring cup
Mix thoroughly and refrigerate
This salad will keep up to 3 weeks, has great flavor but the colors will
decline
Spicy Coconut Shrimp Stew
Serves: 6-8
Ingredients:
3 lb. (21-25 count) peeled and deveined SHRIMP, preferably wild
Salt
2 tbps veg or canola oil
1 large red BELL PEPPER, sliced into very thin 1 1/2-inch-long strips
4 scallions, thinly sliced (white and green parts kept separate)
1/2 cup chopped fresh CILANTRO, divided
4 large garlic cloves, minced
1/2 tsp crushed red pepper flakes
1 can (14.5 oz) petite diced tomatoes, drained
1 can (13.5 or 14 oz.) light coconut milk
2 tbsp fresh lime juice
Rice
Instructions:
Lightly season peeled and deveined shrimp (tails left intact) with salt. Heat
canola oil in a large saucepan set over medium-high heat.
Add red bell pepper strips and cook, stirring frequently, until almost tender,
4 to 5 minutes. Add white portions of scallions, ¼ cup cilantro, garlic, and
red pepper flakes. Cook, stirring, for 30 to 60 seconds. Be sure not to burn
the garlic or the dish will take on a bitter flavor.
Add tomatoes and coconut milk, and bring to a simmer. Add shrimp, partially
cover the pan, and continue to cook, stirring frequently, until the shrimp are
just cooked, about 5 minutes. Watch the shrimp carefully. Overcooked shrimp is
rubbery shrimp.
Stir in lime juice, taste, and add more salt, if necessary. Serve over rice and
top with remaining cilantro and scallion greens.
Cashew Cream
When you need cream or half-n-half in a recipe, this is a very healthy non-dairy substitute. It only lasts a few days in the frig, so make only what you need for a recipe. It just takes some re-training the brain to remember to make it ahead of time.
Ingredients:
2 cups whole raw cashews (not pieces, which are often dry), rinsed very well under cold water
Instructions:
Put the cashews in a bowl and add cold water to cover them. Cover the bowl and
refrigerate overnight.
Drain the cashews and rinse under cold water. Place them in a blender with
enough fresh cold water to cover them by 1 inch. Blend on high for several
minutes until very smooth. (If you’re not using a professional high-speed
blender such as a Vita-Mix, which creates an ultra-smooth cream, strain the
cashew cream through a fine-mesh sieve.)
To make thick cashew cream, which some of the recipes in this book call for,
simply reduce the amount of water when they are placed in the blender, so that
the water just slightly covers the cashews.
Makes about 2 1/4 cups thick cream or 3 1/2 cups regular cream
Prep time: 10 minutes, plus soaking overnight.
Source: Tal Ronnen
Spaghetti Carbonara
I was listening to Ruth Reichl on 'Fresh Air' on the radio. She was the NY Times estaurant critic for years and has written several cookbooks. Terry Gross asked her about her 'go-to' recipe when she comes home late and she wants to cook dinner for her family. This is it! Ruth said that by the time the pasta is finished boiling the sauce is ready to go. Of course you would be using GF pasta. I find I can manage the hard cheeses like parmasan, romano, asiago and cheddar, as the lactose is aged out of them. I try to use pasture-raised meat, so for this recipe I use pasture-raised bacon. And I filter and save the bacon fat for cooking my eggs and greens another day. Anytime I cook this recipe, its a winner dinner.
Serves: 4
Ingredients:
1 pound spaghetti
1/4 to 1/2 pound thickly sliced good quality bacon (I prefer Nueske's)
2 cloves garlic, peeled
2 large eggs
Black pepper
1/2 cup grated Parmigiano cheese, plus extra for the table
Instructions:
Bring a large pot of salted water to boil. When it is boiling, throw the
spaghetti in. Most dried spaghetti takes 9 to 10 minutes to cook, and you can
make the sauce in that time.
Cut the bacon crosswise into pieces about 1/2 inch wide. Put them in a skillet
and cook for 2 minutes, until fat begins to render. Add the whole cloves of
garlic and cook another 5 minutes, until the edges of the bacon just begin to
get crisp. Do not overcook; if they get too crisp they won't meld with the
pasta. Meanwhile, break the eggs into the bowl you will serve the pasta in, and
beat them with a fork. Add some grindings of pepper.
Remove the garlic from the bacon pan. If it looks like too much to you, discard
some, but you're going to toss the bacon with most of its fat into the pasta.
When it is cooked, drain the pasta and immediately throw it into the beaten
eggs. Mix thoroughly. The heat of the spaghetti will cook the eggs and turn
them into a sauce. Add the bacon with its fat, toss again, add cheese and
serve.
Source: www.HomemadeMommy.net
My new favorite dessert. Hands down. It's creamy like mousse, has no weird/chemical ingredients (its REAL food), easy to throw together, and everyone loves it. I haven't even made the ganache frosting yet; it really doesn't need it. I've made a few minor changes to the original recipe, mostly for readability.
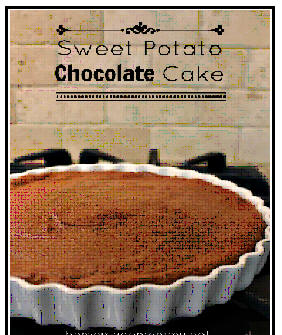
§ 1/2 cup coconut oil
§ 1/3 cup plus 2 tablespoons sugar, divided
§ 6 large eggs, separated
§ 1 1/2 cups cooked and mashed sweet potatoes, about 12 oz
§ 1 teaspoon almond extract
§ 10 ounces chocolate (good quality semi-sweet), melted and cooled
§ 1/4 teaspoon salt
Chocolate Ganache Glaze
§ 1/2 cup cream (or water)
§ 1/3 cup homemade chocolate, coarsely chopped
Directions
Preheat the oven to 350°F. Line a 9-inch springform pan with baking parchment.
Sweet Potato Chocolate Cake
In a mixing bowl, cream the coconut oil with 1/3 cup coconut sugar. Blend in
the egg yolks, then the mashed sweet potatoes, almond extract, and homemade
chocolate.
In another bowl, with clean beaters, whip the egg whites gently until they are a bit foamy. Then add in the salt and whip on a higher speed, slowly dusting in the remaining two tablespoons of coconut sugar to form stiff, glossy (but not dry) peaks.
Fold one third of the egg whites into the sweet potato/chocolate mixture and work them in well to loosen the batter. Then, gently fold in the remaining egg whites.
Spoon the batter into the prepared pan and bake for about 40 minutes. The cake rises and looks dry, and slightly cracked on top when done. The middle should be soft but firm. Cool in the pan for 20 minutes, and then remove to a wire rack. At this point, the cake can be frozen for up to a month. Even if serving it the same day, chill the cake for an hour or two before finishing it with the ganache glaze.
Chocolate Ganache Glaze
In a double boiler, bring the cream or water just to a boil and add the chopped
chocolate all at once. Remove from the heat and stir briskly with a wire whisk
until all the chocolate melts and you have a thick glaze or sauce-like topping.
Refrigerate for an hour or so. (You can also make this ahead and refrigerate it
for up to a week or two. Simply warm it to the right temperature for glazing
the cake.)
Invert the sweet potato chocolate cake onto a plate so that the smooth, flat bottom faces up. Pour the glaze over the sweet potato chocolate cake and, using a metal spatula, even out the glaze and spread it along the sides. I served with whipped cream and fresh strawberries!
Sweet Potato Tagine with Pine Nut CousCous
Source: Pampered Chef
OK, I realize that cous-cous is made with wheat, but I substitute quinoa and its fabulous. This is a vegetarian meal, but really, you don't even miss the meat...its just that good. This is a Pampered Chef recipe. I know!
Serves: 4
Ingredients:
8 oz (250 g) sweet potatoes, peeled
1 small onion
2 garlic cloves, peeled
1 tbsp (15 mL) olive oil
2 tbsp (30 mL) Moroccan Rub
2 medium plum tomatoes
3/4 cup (175 mL) loosely packed fresh cilantro
1 can (15 oz/540 mL) chickpeas, drained and rinsed
2 1/2 cups (625 mL) vegetable broth
1 pkg (5.6 oz or 160 g) toasted pine nut-flavored couscous
Instructions:
1. Cut sweet potatoes in half horizontally then vertically using Santoku Knife.
Slice sweet potatoes and onion using Ultimate Mandoline fitted with v-shaped
blade. Slice garlic with Garlic Slicer; set aside.
2. Heat oil in (10-in./24-cm) Skillet over medium heat 1-3 minutes or until
shimmering. Add sweet potatoes, onion and rub; cook 5-6 minutes or until onion
is tender, stirring occasionally.
3. Meanwhile, seed and dice tomatoes. Chop cilantro using Chef's Knife; set
aside. Add tomatoes, chickpeas, broth, garlic and seasoning packet from
couscous to Skillet; mix well and bring to a boil. Stir in couscous; cover and
remove from heat. Let stand 5 minutes. Garnish with cilantro.
Firstly, I got this recipe from this website, so if you're not familiar with the process, go read what she has to say, its very thorough. I'm assuming you have some prior knowledge of cooking ;) I love this recipe for so many reasons, but probably most of all: its like stone soup...when you don''t thing you have anything in the frig for dinner, you can find enough to make this very satisfying meal. Sometimes I throw leftover chunks of chicken or pulled pork in at the end. Yummo.
Ingredients:
1 cup quinoa
1.5 cup water
1 med/large onion
4-5 cloves carmelized garlic
1 cup fresh or frozen veggies
2-4 tsp soy sauce (or Braggs)
1/8 tsp garlic powder
1-2 eggs, optional
S&P to taste
Cook the quinoa: use the 1:1.5 ratio. So 1 cup of quinoa to 1.5 cups of water. Yes, you can cook it like rice, but the quinoa will come out mushy, not fluffy. This should take about 15 mins.
In a wok or non-stick large skillet, start cooking the onion in some garlic olive oil.
Add some of the carmelized garlic, then some frozen or fresh vegies, cut into bite-sized pieces. Saute everything while waiting for the quinoa to finish cooking. Clean out the frig or freezer!
Toss in the quinoa, a spash of soy sauce (or Braggs), garlic powder or whatever spice/s you like.
Finally move everything to the edges of the pan, crack an egg or two into the center of the pan and scramble that egg, mixing it up with everything else.
Serve and enjoy!